Saturday, October 8, 2011

galaxy online 2: home defence tactic guide 2

If you ever do any attacking you'll find that your ships will sucker the defending ships away from the defensive canons. They will pick off the ships and then they will engage the defense canons.

My defense solves this lure away of my defensive ships by spreading out my defensive canons and covering all the area within range. I make sure all the canons coverage is on the outside edges. I also ensure that each canon covers another canon by a few squares to support it. This way I know that if under attack my defensive canons will be supporting my fleet.

I also notice that when attacking defensive structures is that my ships only attack horizontally and vertically but never diagonally. So I placed my space walls (meteor blocks - or whatever they are called) in a horizontal and vertical fashion leaving the diagonal squares empty.

I put the thor canon near the space station as it has the most range. The space station itself isn't that covered. As I know from attacking other players is that my ships won't attack the space station until everything else is destroyed.

I couldn't find a way to shrink my screen to show the entire layout so I showed a section between the two corners.
Image

Galaxy online 2: Home defence tactic guide

As you all noticed,there are constantly a lot of attacks over planets by stronger players.They always pick a week target,with verry low or no home base defence at all and with a low level Space Station.It's important that we keep our home defences strong,so the most used tactic is a wide fence of Meteor Stars,blocking enemies from attacking the Space Station,and in the empty fields between the blocks and Space Station,are put all of the turrets,Particle Cannons,Anti-Aircraft Guns,And sometimes,if you have a higher level Space Station (level 6+),you put a Thor's Cannon.So your Space Base should look something like this:

Image

It's best to use all of the turrets,to a maximum level,and to their building limit...

Image

Tactic Number 2
-Destroying your openent while he is been delayed by tiny boxes...

-Since there are 2 ways to defend your system,1 made for shorter ranged fighters,and the other one designed for all types of ships...
-This is a tactic where we force our enemy into a trap,he gets the bait (the meteor stars in the corners) while the surrounding turets fire at their ships...They will have to make a trip arround your whole Space Base,while your long ranged turrets attack them...If they are too strong,and your turrets stand no chance against them,theey will still be sent back to their homes due to the round limit (for 2 fleets round limit is 26,for 8 fleets its 29 etc...).
-The idea for this tactic was combined from multiple tactics discussed in this forum and from Space Bases from strong players i have seen...

-I couldn't snapshot the whole Space Base,so just pucture it in your mind...2 fleets each with up to 300 ships,2 pulse canons,1 meteor star and several AAs arround the base...The pulse cannos cover the whole area with firepower,so the enemy will be attacked on each move while moving to the next meteor star...leveling the pulse canons is verry important just in case the enemy attacks them (NOTE: This strategy has not been tested yet...)

Tactic Number 3 -
Enhanced Fort


After putting all of your buildings arround you Spase Station,on a distance of maximum 7 squares of it,and leaving some space between your defensive structures and filling it with decoys (i used 30+ decoy fleets each with 5 ships on it in an X formation...Wiekes 3 with only 1 engine - nothing else...)Here's how it loocked:
Image

Tactic Number 4
This is a pretty good one,but its best when you have a lvl 8 Space Station,so its for the more advanced players...On this image you can find 2 Thors,15 AA Guns,20 Particle Cannons and 40 Meteor Stars...
Its probably the 3rd best tactic arround,So with the following levels,can defend you from 100k ships (TESTED)
-AA Guns all level 6 or 7...
-Particle Cannons level 6 or 7...
-Thors lvl 4 or 5...
-Meteor Stars at level 8-9...
I found out that the meteors have huge importance in the defence system,reasons:
-Every fleet attacks first the meteor stars,than AA guns,than particle cannons and thors...Ofcourse the Space Station comes last when all defences and defending fleets are destroyed...Oh if you have fleets arround,they are the main target...
-So,as long as the meteors hold,the more rounds it will take the enemy to destroy you,the more damage your defences do to them...
-If you manage to level the meteor stars to level 10 or all 40 to level 9,than you can boost up the ammount of ships your defences will destroy to even 150k ships...Talking about howlers with 2 X particle stun shield,2 X heat defusion and 2X space-time magnetic shields...And some good tech advancent...All that is tested and calculated...
-Level your meteors!It's important...
*Someone sad that this game is made totaly to give advantage to the attacker,and give a big disadvantage to the deffender...I totaly disagree with that since with certain levels,you can get to defend yourself from 500k ships,maybe even Tiamats using Pandora III and tons of sheilds...
Yeah lets get to the image already...

Image

I also suggest adding some decoys in the empty spaces,and make sure they do not have weapons on them,that way the attacker will be delayed even more before being able to attack you guns and Space Station...
You whould get A LOT of help if you have a TANK fleet right next to your Space Station,maybe add only 1 weak gun on it,just to make it move...The tank fleet should consist of 27k ships,9 X 3k stacks,with atleast Howler - III as the hull and atleast x5 of all space-time magnetic,heat defusion,particle stun shields...

What happens if they destroy my Space Station?

-Don't worry...All of your ground buildings will remain as they were before the attack,but all of your resources will be taken and all of the buildings arround your Space Station destroyed.Don't give up hope!Collect some resources and start rebuilding...We learn fromm our mistakes and we shall have revange!

What will happen to my docked ships?

-They will remain docked even after the attack.But the ships that were arranged in fleets and not docked,will be all destroyed...

What happens to the commanders that were leading the destroyed fleets?

-They are either dead or in hospital.If they are dead,you can use a revival card to revive them,which you can get by lucky weel or you can buy it...Those who are in hospital,will remain there untill the healing time is over.You can also use a heal card,to heal them quicker.

Galaxy Online 2: Alin Musat's Science Research Guide For Newbies

Science Research Guide


I figure many fresh players get discouraged when they check the science research section for the first time so I'm going to try lend a hand.
There are two strategies that i found would be good for starter players and both start the same, than continue their own paths, I'm going to use 1 post for the first half and another one for each divergent path.


First Half(General)


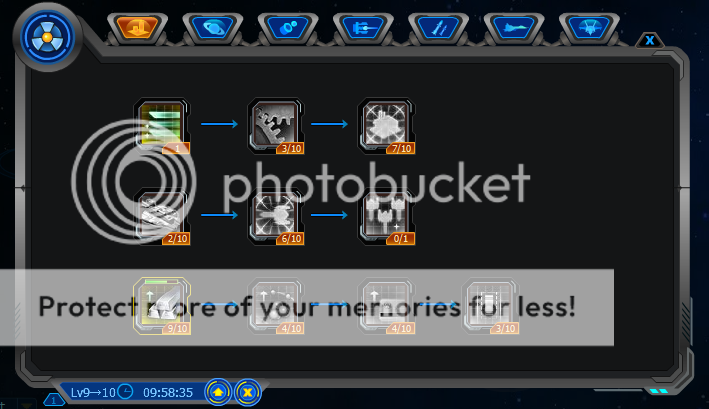
As the game suggests you must first start with "Logistics", its the first tab that opens when you click on "Science Research", and it looks like this:

Image

First things first, this is a must do, follow the quest and get Concurrent Construction, from the top left part of the selection.

You can notice that the first few levels on each research costs and takes less time than the rest, so getting High Yield Mining, High Yield Chemistry and High Yield Investing to level 4 or 5 should be fairily easy, and this allows you to get 4% or 5%(depending on how high you went) more resources that you normally would.The 3 "High Yield" can be found on the bottom row.

Next you may notice that buildings get graduately expensive and cost more, there are some research options that can help with that, you will find them on the top row, along with "Concurrent Construction", they are called "Quality Materials" and "Construction Boost". Their effects are reducing resources and time taken to build, getting them both up to level 4 can be done within a day.

Next the player wants to get to try shipbuilding, for this there's the middle row in the Logistics tab, it has "Ship Building Boost", that decreseas the time needed to build a ship(or speeds up shipbuilding speed, whatever you prefer) , "Ship Building Logistics" , research that decreases costs of shipbuilding and "Sync Shipbuilding", which adds another slot for shipbuilding. So far I would advice you get only shipbuilding logistics up to level 4-5, since resources would still be scarse, and the other options somewhat increase costs over time.

To Sum Everything Up Step By Step:
1x"Concurrent Construction"
4x"High Yield Mining"
4x"High Yield Chemistry"
4x"High Yield Investing"
4x"Quality Materials"
4x"Construction Boost"
4x"Ship Building Logistics"
 
Second Half(Resource Based or Pacifist)


Since this part is also about resources I think you can guess what we're going to upgrade.
Yes, indeed Logistics, from here on its not hard, just long.(yes that sounded strange to me as well:lol)
First up, take a look in the bottom row on the far right, you'll find "Expand Capacity", get 2-3 levels in this for starters so you have more space to gather your resources in.
Next up, you should start upgrading the bottom row, the 3 "High Yield" options to be exact, go up to level 7 for starters , its a real hassle afterwards.
After completing level 7 for the 3 "High Yield" options, direct your atention to "Quality Materials" and "Ship Building Logistics", again up to about level 7, as the time and money used starts getting annoying at that point.
Now nobody can call you a newbie, and a week should have passed already *wink*.
Side Note:The Second Half(Shipbuilding) might be helpful at this point.
 
Second Half(Shipbuilding)


Alright, now to start it up, i'd like to mention that all weapons are good, but I chose Ballistics and Directional because they are the best on He3 ratio and of couse that makes them good in instances.

To start things off I'd like to present the "Ship Defence Science" Tab:

Image
Out of here we'll need the first research option, "Ship Defence Tech", found in the far left, it takes under 5 minutes and 10k gold to get it up to max, which is level 2 and provides quite a nice boost.

Next up, lets check the weapons department I choose Ballistics and Directional and I'm going to explain the main need when using them getting an atack to hit more than 1 square, Directional hits collumn and Ballistic hits row.

Lets start with the Ballistic Science Tab:

Image

If you would oblige as to check the bottom you'd see "Ballistic Scattering", that is the actuall tech you are looking for to get your ships hitting the entire row in front, on the way you will need "Ballistics" which increases damage by up to 10%, "Ballistic Malice" which increases critical hit rate by up to 5%, "Steady Control Tech", which decreases space occupied by ballistic weapons and "Precise Ballistics" which increases the hit rate of ballistic weapons.

So far so good, you now have a weapon that deals more base damage, has higher crit, takes less space and is more precise, make it do scatter damage(damaging entire row) and add the fact that it hits every round it is in range and you got urself an awesome instance weapon for beginners.

Lets move on to Directional Science Tab:

Image

Same idea as with Ballistics we need to get the weapon do damage more than one enemy, how to do that, get "Pierce" which can be found on the top row, second slot from the left. In order to get it you need to walk the same research path shown in the pic(yes I am a Directional weapons fan).
So, follow it with me, "Optics", damage increase, than "Directional Malice", critical chance increase, than "Directional Accuracy", hit rate increase, "Eagle Eye", steering power increase, "Energy Penetration", hit rate increase and 5% chance to go penetrate shields, than we end up at "Pierce".

The big difference between Directional and Ballistics is that Directional has increased range but can only atack once every 2 rounds, with increased power compared to Ballistics of course.


Galaxy online 2 : kevin zx's Introduction to Layering in Ship Design

Introduction to Layering in Ship Design
Fundamental Principle of Ship Designing


Comment: I wanted to include this into my first topic 'Survival Basics for the N00B' but word count exceeded. So I decided to post another thread specially for Layering.

What is Layering?
As you know, several weapons in GO2 requires cool down(CD) e.g. ship-based weapon. Layering (first started in GO1) is introduced to optimize both round so as to be more efficient in battle.

Layering is done by having either a mixture of weaponry or different levels of a weapon type arranged in a systematic order within a fleet, instead of just using one single type of weapon on your ship. This principle can also be applied to defensive modules.

Image

How Layering Works?

The fighting mechanics works in such a way: if the first weapon is incapable of annihilating the enemy stack, the subsequent weapon will also be deployed, to the point whereby the enemy stack can be totally destroyed. (examples below)

Why Layering?

If only one weapon is needed, only that weapon will be fired. This saves the rest of the weapons for the next round so you can kill more fleets in the next few rounds. There is also a limit to the rounds for battle, so its ideal to take less rounds to clear the enemy.

The following examples will serve to illustrate this concept (hopefully you can understand better). The ship design used in the example is as follows:

Image

Weapons
Hammerhead I X1
"Warhammer" Streamliner III X1
Hammerhead II X1
Hammerhead III X3
*These are ship-based weapons with cool down(CD) of 4
[requires 4 rounds before firing again]

Defensive Modules
Particle Stun Shield III X1
Heat Diffusion Shield III X2
Detonator Shield III X1
Reflective Plating III X1
Quick Reaction Armor III X1

*Other non-offensive/defensive modules not mentioned in example are omitted

-------


Example 1 - Attacking Weaker Fleets
Image

In this case, Hammerhead I (X1) is sufficient to destroy the enemy stack, so only this weapon is fired. This will leave "Warhammer" Streamliner III, Hammerhead II & Hammerhead III for the next round.

Image

In round 2, "Warhammer" Streamliner III (X1) can wipe out a stack. This leaves Hammerhead II & Hammerhead III for next round and so on.

How your weapons fired in each Round will look like this:

ROUND 1: Hammerhead I
ROUND 2: "Warhammer" Streamliner III
ROUND 3: Hammerhead II
ROUND 4: Hammerhead III
ROUND 5: CD
ROUND 6: Hammerhead I
ROUND 7: "Warhammer" Streamliner III
.
.
.

Additional Note: The subsequent order of fire is fixed as other modules need 4 rounds to cool down, unless the other modules have a lower CD.

-------


Example 2 - Attacking Stronger Fleets
Image

Hammerhead I and "Warhammer" Streamliner III is used, leaving Hammerhead II and III for next round. If the next round requires both Hammerhead II and III, there will be a cool down period.

ROUND 1: Hammerhead I & "Warhammer" Streamliner III
ROUND 2: Hammerhead II & Hammerhead III
ROUND 3: CD
ROUND 4: CD
ROUND 5: CD
ROUND 6: Hammerhead I & "Warhammer" Streamliner III
ROUND 7: Hammerhead II & Hammerhead III
.
.
.

-------


Example 3 - Full Barrage
Image

More often than not, all your weapons are fired. This is the most common case unless you have heavy stacks and/or powerful weapons or when you are fighting decoys.

ROUND 1: All weapons fired
ROUND 2: CD
ROUND 3: CD
ROUND 4: CD
ROUND 5: CD
ROUND 6: All weapons available
.
.
.

-------


Example 4 - Defending Against Weaker Attacks
Image

Same as weapons, only Particle Stun Shield is used since attack is weak. (Also, you may layer different levels of the same shield but I have reservations about such arrangement)

-------


Example 5 - Defending Against Stronger Attacks
Image

In this case, more shields are used. However Reflective Plating and Quick Reaction Armor are still untouched.

-------


Additional Note: The order you place the weapons and shields will affect which one gets to be used first. The first you place inside your ship will be the first to be used.

galaxy online 2 guide: Uncommon Commander Reference Guide

Here i give you a quick reference to look wich ones you are missing, and to learn their starting stats, skill and interesting facts. Enjoy!!

Angla
Image
Spell
Fleet EMT :Reduces hospital time and prevents anyone from killing the Commander. The Dodge attribute affects this ability.
Bio: Angla is the most mysterious of them all. Rumor has it her DNA was modified and strengthened when she was young, and many believe it. Those who have served with her speak of a fearlessness bordering on recklessness. Whether or not the rumors are true, this much is certain: she is one of the most experienced commanders available, and the veteran of too many campaigns to count, but she's never spent more than a few days in a hospital, no matter how badly she was injured.
Acc: 4 Ddg: 4 Spd: 5 Elc: 7
Ball: B Dir: B Msl: C Sb: C Pdef: D Frig: B Crui: C Batt: B

Leo
Image
Super
Intimidate: Has a chance to reduce the Durability, Armor and Shields of enemies within 2 steps by 5% after every turn. The Electron attribute affects this ability.
Bio: Leo suffers from an unknown disease and has a long history of taking painkillers. These strong medications have ruined his once proud features and given him a monstrous visage. However, underneath he is still a great with a spotless record and a fierce reputation for penetrating enemy flanks and doing damage from within. No one knows how he manages to pull it off successfully every time, taking the enemy down without so much as a scratch. He is a brilliant strategist who takes his enemy down systematically, almost enjoying the fact that there is very little they can do to stop the inevitable.
Acc: 5 Ddg: 9 Spd: 6 Elc: 8
Ball: A Dir: C Msl: B Sb: C Pdef: C Frig: B Crui: B Batt: B

Natiya
Image
Spell
First Strike: At the start of each round, has a chance to increase the Commander's speed by an amount equivalent to the Commander's level*10. The Speed attribute affects this ability.
Bio: Natiya graduated from the Command College as the top pilot in her class. She uses her incredible luck to her advantage in battle, getting the drop on enemy commanders before they even know she's there. Once engaged, she makes full use of her speed, effectively dealing the first and often the most decisive strike before the enemy can react.
Acc: 8 Ddg: 8 Spd: 6 Elc: 8
Ball: B Dir: B Msl: C Sb: C Pdef: D Frig: B Crui: B Batt: C

Reggie
Image
Spell
Paralyze: Has a chance to reduce the hostile Commander's attack power and and block the use of his/her ability for the next round. The Electron attribute affects this ability.
Bio: Reggie is an electronic engineer. His knowledge of AI systems technology has helped him survive many battles despite steep odds against him. He has also survived several assassination attempts. Reggie incorporates this technology into his attacks, enabling him to negate an enemy's abilities. This allows him to take down his foes without much resistance.
Acc: 5 Ddg: 3 Spd: 8 Elc: 4
Ball: B Dir: B Msl: C Sb: B Pdef: C Frig: C Crui: D Batt: B

Eveline
Image
Super
Find Weakness: Has a chance to ignore the target's defenses. The Accuracy attribute affects this ability.
Bio: Close friends of Eveline say she was a humble, hardworking girl with exceptionally strong willpower. Using her persistance and experience in battle, she specializes in destroying enemy defenses. Eveline was born to be a leader and an outstanding warrior, always ready to protect the people in her galaxy and fight for freedom.
Acc: 7 Ddg: 6 Spd: 9 Elc: 5
Ball: B Dir: A Msl: B Sb: C Pdef: C Frig: C Crui: B Batt: B

Stani
Image
Legendary
Interference: Has a chance to prevent the enemy from moving and attacking for the next round. The Accuracy and Electron attributes affect this ability.
Bio: Some say Stani is a man. Others say he is a monster. Regardless of the rumors and his appearance, his close friends know him as a battle-hardened with vast knowledge of electronic inpulses and circuitry technology. He often uses electronic interference to jam enemy communications and signals, effectively crippling them before he moves in for the kill.
Acc: 5 Ddg: 8 Spd: 5 Elc: 10
Ball: B Dir: B Msl: B Sb: B Pdef: A Frig: A Crui: A Batt: A

Sofia
Image
Spell
Maneuvering: Has a chance to move an extra 3 spaces. The Speed attribute affects this ability.
Bio: Sofia started off as a common mechanic. She took part in many battles before proving her skills and resourcefulness during one such battle. She was forced to assume command of a ship and managed to rescue the remainder of the crew when they were trapped behind enemy lines. After this incident, she quickly rose through the ranks to become one of the bravest commanders in the service. Her lack of formal training forced her to rely on long-range attacks and maneuverability to avoid the dangers of close combat.
Acc: 7 Ddg: 5 Spd: 11 Elc: 0
Ball: B Dir: B Msl: C Sb: D Pdef: B Frig: C Crui: B Batt: C

Jason
Image
Spell
Save Energy :Has a chance to prevent modules from consuming He3 while attacking or defending. The Electron attribute affects this ability.
Bio: To many, Jason may seem like your average engineer. In reality, he is a genius in the field of energy systems. The Energy Source Conversion Technology he invented allows him to remain active in battle by transferring incoming damage into energy, which is particularly effective in large-scale battles.
Acc: 4 Ddg: 2 Spd: 5 Elc: 5
Ball: D Dir: C Msl: B Sb: B Pdef: C Frig: B Crui: B Batt: C

Maletiz
Image
Legendary
Revenge: Has a chance to absorb all damage and reflect it back to the attacker. The Dodge and Electron attributes affect this ability.
Bio: Maletiz began his life in a den of ferocious wolves and emerged one of the bravest warriors of the wolf clan. He relies on his killer instincts to survive the toughest battles, using a combination of cunning and ferociousness to destroy his enemies. Maletiz often starts by baiting his enemies. Once they attack, he pounces on them, killing them in one devastating strike
Acc: 2 Ddg: 2 Spd: 2 Elc: 2
Ball: C Dir: B Msl: B Sb: C Pdef: B Frig: C Crui: S Batt: C

Nick
Image
Super
Divine Intervention: Has a chance to avoid damage. The Dodge attribute affects this ability.
Bio: One of the most mysterious of commanders, Nick uses a series of unpredictable strategies to outmaneuver his enemies. Rumor has it he is endowed with an uncanny ability that makes him invulnerable in battle. He makes full use of this ability to trap and destroy his enemies, sending them fleeing in fear.
Acc: 5 Ddg: 4 Spd: 5 Elc: 2
Ball: A Dir: B Msl: C Sb: B Pdef: C Frig: B Crui: C Batt: B

Jerome
Image
Spell
Curse: If attacked, the enemy will receive 10% more damage the next round (stackable). The Accuracy attribute affects this ability.
Bio: Known as the "Witchdoctor" Jerome is a chemical and biological warfare researcher who uses unconventional weaponary in battle. He modifies his fleet with these devices, which seem to allow him to mysteriously "curse" his foes, dealing additional damage in retaliation.
Acc: 5 Ddg: 8 Spd: 2 Elc: 5
Ball: C Dir: B Msl: C Sb: C Pdef: D Frig: B Crui: B Batt: B

Aileen
Image
Legendary
Command Break :Has a chance to reduce the hostile Commander's stats to 0. Electron and Speed attributes affect this ability.
Bio: An accomplished pirate slayer, Aileen has earned her reputation as both a beautiful and cunning commander. Her encounters with the infamous pirate groups have become legendary. She has led her forces through some of the toughest battles in history, smashing her way to victory even against the steepest of odds. She cripples her enemies' ability to think, making them an easy kill.
Acc: 8 Ddg: 8 Spd: 8 Elc: 8
Ball: B Dir: A Msl: B Sb: A Pdef: B Frig: A Crui: B Batt: B

Alicia
Image
Spell
Inspiration :Has a chance to increase the damage dealt by the ship in the next slot of the formation by 30%. The Accuracy attribute affects this ability.
Bio: One of the greatest commanders, Alicia has made a name as a no-nonsense, no-mistakes personality. Though many whisper that she received her promotions because her predecessors were removed, Alicia is respected as a person of strong convictions. Her experience with formations allows her to target enemy formation weaknesses, destroying them with ease.
Acc: 9 Ddg: 3 Spd: 7 Elc: 5
Ball: C Dir: C Msl: B Sb: B Pdef: B Frig: D Crui: B Batt: C

Panis
Image
Spell
Intercept :Increases the chance of air interception. The Electron attribute affects this ability.
Bio: Panis joined the Galactic Fleet for glory, loyalty and pride. She specilizes in interception technology, allowing her to counter anti-air attacks effectively. She believes that all pirates are scum that should be eliminated and has contempt for pirates that turn over a new leaf.
Acc: 5 Ddg: 5 Spd: 6 Elc: 12
Ball: C Dir: D Msl: B Sb: C Pdef: C Frig: B Crui: B Batt: B

GALAXY ONLINE 2 GUIDE: Attributes Analysis for Weapons

Each weapon has 4 different damage attributes: Kinetic Damage, Solar Damage, Explosive Damage and Magnetic Damage. For defensive groups, the equipped shield module or the ships armor will be able will help in resisting certain types of damage.

Particle Stun Shield: Reduces Kinetic Damage
Heat Diffusion Shield: Reduces Solar Damage
Space-Time Magnetic Shield: Reduces Explosive Damage
Detonator Shield: Reduces Magnetic Damage
Chrome Armor: Reduces Solar Damage & Kinetic Damage to the lowest level
Nano Armor: Reduces Solar Damage & Explosive Damage to the lowest level
Regen Armor: Reduces Kinetic Damage & Magnetic Damage to the lowest level
Neutralizing Armor: Reduces Explosive Damage & Magnetic Damage to the lowest level

When attacked, if a ship has no module/armor to protect against specific types of damage, they will suffer the full damage amount.
Therefore, if you know in advance what kind of weapons an enemy will be using, you can protect your ships with the corresponding armor type.

Here's What You Need to Know...

Packing Round

To use a weapon, one critical aspect that deserves attention is how long it takes to load. If it shows as 0, you can use the weapon immediately. However, if it shows 1, you cannot use it now and must wait til the next round.

He3 Costs

When you use a weapon, it will cost a certain amount of He3. That’s the EN during battle. Also, you need to know how many weapons you’ve got on your ships. For example, if you set Rocket Frame-III on your ship, and each Rocket Frame-III costs 0.07, if you equip 5 Rocket Frame-III's on a ship, you will consume 0.35 He3 each time you fire. If you have 100 ships of this type, each volley will cost 35 He3.

Piercing Damage

After some special research, these types of weapons will be able to cause damage to multiple targets. If Pierce is at 20%, then when you attack a ship, it will also cause 20% damage to other ships in the same line of the target. This effect is independent, and cannot be avoided by a commander’s skill.

When creating a ship, having an appropriate plan for that ship is essential! The space available on a ship is very limited, so only the best and most suitable weapon(s) should be chosen. Don’t waste materials and ship space on weapon(s) you don't need.

Different Attributes for Different Weapons
1.Ballistic Weapons
Shooting Range: 1 - 2 (up to 4 with tech)
Packing Round: 0
Attack power in a round: Low
He3 Consumption: Low
Attribute: Kinetic/ Solar
Piercing Damage: All enemies in the same row as the target will suffer some damage.
Cannot be blocked
Feature: Attacks target directly
Introduction
The weapon of choice for close combat. Though its shooting range is 1 – 2 and its attack power is low, it's true value is the ultra fast packing time of 0. This allows the ship to continue firing almost continuously, even when enemies are reloading their weapons!
Advantages: When attacking a target, all the enemies in the same row as the target will suffer damage equal to 50% of the attack power. With a range of 1-2 slots, the attack power in the 2nd slot will be 220% of the attack power, making for a very powerful attack.
Another advantage of having a 0 packing round is defeating enemies quickly, which helps a lot in the instances.
After improving the range of these weapons to 4 with help from the Research Center, these weapons will be able to smash through shields.
Disadvantages: If these weapons are not upgraded they are good for nothing more than close range battles, and they offer little power even for that. Also, if you don't much speed, you won't be able to hit anything with it. Research into these weapons also takes time and resources, making it difficult to improve these weapons to the level needed to make them very effective.
These weapons not only require research to boost them, but the speed to make them effective. This means a ship armed with Ballistic Weapons must also have good engines. These engines require more space on the ship, meaning less space for other things, like shields or more weapons.
What’s more, this weapon only has kinetic and solar power, so it cannot destroy metal shield ships!
Conclusion: These weapons are great if you have enough time to research them up to higher levels. But if you don't, there are better options.
2.Directional Weapons
Shooting Range: 2 - 5 (up to 6 with tech)
Packing Round: 1
Attack power in a round: Low - Mid
He3 Consumption: Low
Attribute: Magnetic/Solar
Piercing Damage: All enemies in the same row as the target will suffer some damage.
Cannot be blocked
Feature: Assistant attack
Introduction
The most popular assistant mid-range weapon. Because of the 2 – 5 shooting range, it has a very flexible range of attack.
Advantages: The shooting range of 2 – 5 allows for a wide range of uses in either close combat or longer range combat.
It also has the best shooting rate and great attack power. Enhanced with the right commander spell and the ship will also deliver a great Dodge rate.
After some development, it will decrease target’s hit rate, attack power, speed and more. It also destroys ships with ballistic weapons.
Piercing damage - After being improved, piercing damage on other targets will rise to 25 – 30% of attack power.
What’s more, it has the lowest He3 consumption of all weapons, making it the best choice for challenging instances.
Disadvantages: Like Ballistic Weapons, these start with low attack power. To enhance their attack power, you must equip several of them, making it hard to defeat target's with great defense.
Conclusion: These weapons are easy to control and use in the beginning. However, even with research, they will do little damage to a high defense ship. Keep in mind that the ace in the hole for this weapon type is the low He3 consumption, and if you're patient (and last long enough) you'll win when they run out of power.
3.Missile Weapons
Shooting Range: 5 - 8 (up to 11 with tech)
Packing Round: 3
Attack power in a round: Mid - High
He3 Consumption: Mid - High
Attribute: Explosive Damage
Piercing Damage: Attacks all the enemies
Can be blocked
Feature: Dispersion Damage
Introduction
Long distance weapon. The dispersion damage will affect all enemies. When attacking a target, the other ships on the 8 fleet tiles will also suffer damage equal to 25% of the attack power.
Advantages: Powerful dispersion damage will distribute deadly amounts of damage to a lot of ships. Further research into these weapons only improves the amount of damage.
Disadvantages: High He3 cost. You always run the risk of running out of power before you run out of targets.
The packing round is a little long and can leave you exposed to enemy fire.
Most importantly, these types of weapons can be blocked.
Conclusion: This is a powerful weapon with a high attack power, but it also has some fatal disadvantages.
4.Ship-based Weapons
Shooting Range: 6 - 10 (up to 15 with tech)
Packing Round: 4
Attack power in a round: High
He3 Consumption: Mid - High
Attribute: Kinetic, Heat, Explosive and Magnetic
Piercing Damage: None
Can be blocked
Feature: Long distance attack
Introduction
This weapon has the longest range and highest base attack. Further research will expand the range of its attacks and increase damage at range.
Advantages: The perfect single attack weapon. Even the 220% attack power adding ballistic weapon cannot match it. It also has the longest shooting range and can critical hit from up to 10 slots away.
The long range advantage also makes it virtually immune to attacks from other ships, because they have to last long enough to get close and hit it. Side and Rear defenses are also generally unnecessary.
With 4 different attributes, it can destroy the defenses of all ship types.
After doing some research, these ships will also feature a 20% blocking rate! This makes it ideal for both attack and defense.
Disadvantages: High He3 cost.
Its shooting range is from 6 – 10 slots, which means from the 1 – 5 slots it won’t be able to attack anything. This makes it vulnerable to attacks by short range weapons.
It’s a single attack weapon, it cannot initiate any AOE skills.
Conclusion: Ship-based weapons are great unless that all you've got. However, used together with other weapons to provide the ship with balance, they can be a great tool.

All weapons have their advantages and disadvantages, so if you're planning to last long out there, you've got to figure out what to do with what you've got. This means making the best use of limited ship space and planning out what kinds of ships you'll need based on what kinds of enemies you'll be facing.
GALAXY ONLINE 2 GUIDE: Basic Production Introduction

Basic Production: Net Output
Take money for example, if you use Extra Tax and Extra Tax (Adv) functions, the final output of cash will be Net Output*(30%+100%).
Tax collecting is not the only way to increase output, the level of your Corps and whether or not your Corps has seized control of the Resource Bonus Planet will also affect output.
1.jpg
2.jpg
3.jpg
4.jpg
5.jpg
6.jpg

GALAXY ONLINE GUIDE 2: GEM SYSTEM

Players can get different gems from the Item Mall or earn them as rewards for special events or finishing instances. There are 5 types of gems: Raw Gemstone, Ruby, Sapphire, Emerald and Diamond.

Raw Gemstone does not have a level and cannot be socketed directly. However, 4 Raw Gemstones can be compounded into a Level 1 gem (but not Diamond).

Players can get Raw Gemstones by doing daily quests, spinning the Fortune Wheel, doing a Challenge quest or buying a Treasure Box from the Corps Mall.

Rubies, Sapphires, Emeralds and Diamonds each have a special attribute. Rubies increase attack power, Sapphires improve defense, Emeralds improve Luck and Diamonds improve the expertise attribute and EXP gain.

[attach]422[/attach]

There are 5 gem levels. Level 1 gems can be compounded into higher level gems.


In the Merging Center, players can socket gems to commanders. They can also unequip all the gems and then upgrade them or socket them to another commander. If you want to socket a gem to a commander, you must place it in the corresponding slot. Only a diamond slot can be socketed with different types of gems. The diamond compounding slot will be available when your commander reaches the necessary level.
Attachments
1.jpg
2.jpg
3.jpg
1.jpg

Galaxy online 2 guide: GEM EFFECT

Rubies are good at improving these attributes: Accuracy, Attack Power and Critical Hit Rate.

Sapphires are good at improving these attributes: Dodge, Structure, Shield and Shield Recovery.

Emeralds are good at improving these attributes: Electron, Speed, Critical Hit Rate and Combo Hit Rate.

A Diamond slot can be socketed with any kind of gem, but EXP and expertise effect gems can ONLY be socketed in the Diamond Slot.

1.jpg

2.jpg

3.jpg
3.jpg (74.31 KiB) Viewed 49 times
4.jpg

GALAXY ONLINE 2 : ship design guide

In GO II, one of the most fascinating aspects of the game is the ability to design and create warships.Customizing your own ships can be a lot fun, but it can also be challenging.Here we will be discussing the theory behind designing warships and the best ways to go about creating them.


Theory 1: Movement
[size=12pt]There are a lot of factors to consider when designing your own ships, but some are more important than others. Agility is one of the most important. If you create a ship that moves too slowly, your fleet will not even be able to catch other ships, let alone engage them in battle – rendering the ship (and design) useless. However, if you focus on speed to the exclusion of all other factors, you may end up with as peed demon that does little else but buzz around other warships, making it little more than an irritant to larger, more well equipped ships.

[size=12pt]The main thing to keep in mind when deciding on the right amount fo speed to give a ship is attack range.Generally speaking, the lowest speed requirement for a ship is 2 points. For long range attack ships, only 2 points of movement speed is enough, because they don't need to catch up to a target before beginning an attack. These kinds of ships include ones with Directional Weapons and Missiles. These ships also tend to be the best ones for challenging instances.
[size=12pt]For ships utilizing Ballistic Weapons, up to 3 – 4 movement speed points are needed before they become effective! This means that 3-4 thrusters are needed to provide them with the proper amount of movement, though this can consume a lot of space.
As in most things, balance between whats needed and whats wanted must be maintained because of the space limits.


Theory 2: Attack Power
Attack power is usually the star of the show, and is usually the first thing Captain's look at – and forgood reason. Consider carefully exactly what role this ship is meant to play and how it will be used. This can help make decisions on what to add to your design easier.
So what you must know before creating ship?

1.
Quality is more important than the quantity!
Rules for designing high quality warships
1). Developing the weapons by Level 3
2). Highest attack power
3). Appropriate space used
4). Appropriate He3 consumption

2.Make full use of ship space
Maintain a balance between attack power and agility. The most successful ships are the ones with the highest attack and perfect speed! Workhard to find the sweet spot between weapon(s) and thruster(s).

3.How to set weapons?
When creating a ship design, try not to make a ship that loses sight of its intended role. Adding several different kinds of weapons may seemlike a good idea, but it can quickly eat up space better utilized for thrusters or more of one weapon type.


Theory 3: Shields
[size=12pt]This may seem like a no-brainer,but don't neglect shields in your design. No matter how powerful you may think you're ship design is, when the orange HP hits zero it's game over!!!
Related Posts Plugin for WordPress, Blogger...